
useContext hook is a simple and effective way to manage state without the hassle.
Effective state management is a cornerstone of building a robust React application. In the context of Next.js, which offers server-side rendering (SSR) and a sophisticated application structure, managing state efficiently becomes even more critical. While there are numerous state management libraries available, React’s built-in
useContext hook, combined with the Context API, provides a straightforward and efficient solution for sharing state across components without the need for prop drilling. 1. What is useContext?
The useContext hook in React allows components to access context values directly, eliminating the necessity to pass props through every level of the component tree. In Next.js applications, this is particularly beneficial for managing global states such as user authentication, theme settings, or user preferences.
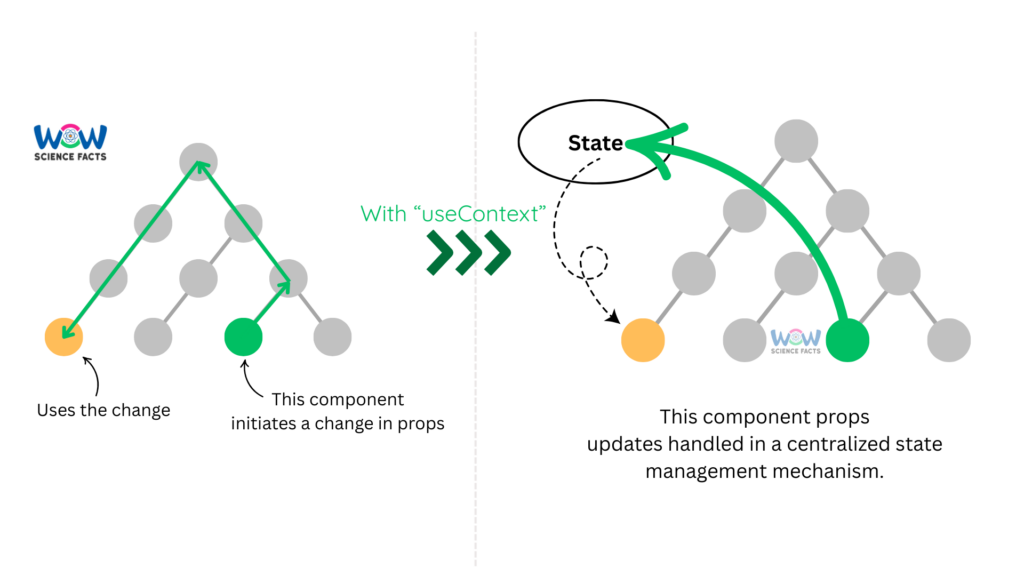
By leveraging useContext alongside React’s Context API, Next.js application developers can establish a global state that is accessible throughout the component hierarchy [Figure 01]. Instead of drilling props, any component within the context provider’s scope can consume the shared state directly. This not only simplifies the code but also enhances maintainability by decoupling state management from component nesting.
2. How to use useContext in a Next.js application?
useContext tutorial! Here’s the essential file structure for the useContext-based language switcher tutorial:
					/my-nextjs-app
├── /src
│   ├── /app
│   │   └── /page.js            // Uses LanguageContext here
│   ├── /components
│   │   └── LanguageSwitcher.js  // Components to allow users to switch languages
│   └── /context
│       └── LanguageContext.js   // Defines LanguageContext and its provider
HomePage component, we define an object translations, which contains translations for both English (en) and Spanish (es). This object holds the title and description text in both languages, and we dynamically display the corresponding text based on the selected language by referencing translations[language].
					'use client';
import { useLanguage } from '../context/LanguageContext';
import LanguageSwitcher from '../components/LanguageSwitcher';

const HomePage = () => {
  const { language } = useLanguage();

  const translations = {
    en: {
      title: 'Welcome to Next.js!',
      description: 'This is a simple multi-language app using useContext.',
    },
    es: {
      title: '¡Bienvenido a Next.js!',
      description: 'Esta es una aplicación multilingüe simple usando useContext.',
    },
  };

  return (
    <div>
      <h1>{translations[language].title}</h1>
      <p>{translations[language].description}</p>
      <LanguageSwitcher />
    </div>
  );
};

export default HomePage;
useLanguage custom hook we define using context to access the current language and the LanguageSwitcher component to allow users to toggle between languages. Now let’s build the useLanguage custom hook.
					'use client';
import { createContext, useContext, useState } from 'react';

const LanguageContext = createContext();

export const LanguageProvider = ({ children }) => {
  const [language, setLanguage] = useState('en'); // default is English

  const switchLanguage = (lang) => {
    setLanguage(lang);
  };

  return (
    <LanguageContext.Provider value={{ language, switchLanguage }}>
      {children}
    </LanguageContext.Provider>
  );
};

export const useLanguage = () => useContext(LanguageContext);
- createContext initializes the
LanguageContext. - LanguageProvider holds the
languagestate and aswitchLanguagefunction. - useLanguage is a custom hook to easily access the context’s values.
LanguageSwitcher component where users can toggle between languages. useLanguage custom hook we created above lets the this component access the current language and the switchLanguage function.
					'use client';
import { useLanguage } from '../context/LanguageContext';

const LanguageSwitcher = () => {
  const { language, switchLanguage } = useLanguage();

  return (
    <div>
      <p>Current Language: {language === 'en' ? 'English' : 'Spanish'}</p>
      <button onClick={() => switchLanguage('en')}>English</button>
      <button onClick={() => switchLanguage('es')}>Spanish</button>
    </div>
  );
};

export default LanguageSwitcher;
LanguageContext.js defines a context (LanguageContext) and a provider (LanguageProvider) to manage the selected language globally. 3. Where to use - Redux vs useContext in Next.js
useContext and Redux offer powerful solutions — but they serve different purposes. useContext is a great built-in option for sharing simple or moderately complex states like themes or language settings without prop drilling. On the other hand, Redux is better suited for large-scale applications where state management requires advanced features like middleware, time-travel debugging, and centralized control over actions and reducers. Understanding their differences helps you pick the right tool for the job. Hence, thought to show differences in the following Table 01. | Feature | useContext | Redux |
|---|---|---|
| Complexity | Simple, minimal setup | Complex, requires setup with actions, reducers, and store |
| Use Case | Local or sub-global state (themes, language) | Global state management for large apps |
| Performance | May cause re-renders if not optimized | Optimized with selective updates and middlewares |
| Integration | Built-in React feature | Requires installing Redux and configuring store |
| State Persistence | No built-in persistence | Can persist state (e.g., Redux Persist) |
Table 01: Comparison between useContext and Redux
Hope this simple language switching app tutorial has given you a clear understanding of how useContext works in a Next.js app to manage global state. This approach not only simplifies the state management but also ensures that updates are reflected throughout the application without the need for prop drilling. You can apply this pattern to other parts of your app, whether for global or sub-global state management, to create more modular and maintainable code.
Happy Coding!


