Why we should move into a headless WordPress design?
WordPress is an open-source, beginner-friendly content management system (CMS) with an extensive plugin ecosystem. However, WordPress’s back-end is server-side rendering (SSR), but it introduces some performance overhead compared to modern frameworks like Nextjs (a very popular React-based framework). What are the advantages of using Nextjs as a frontend framework while still using WordPress for backend as the CMS. Do we get any benefit from this? Yes, There are many advantages in site performance, while enjoying easy manage of the content using WordPress and for a developer like you and me we can use best modern coding practises in the front-end. The following are the main advantages of having an efficient front-end combined with WordPress.
Benefits from Next.js
Performance Optimization:
Both WordPress and Nextjs use server-side rendering (SSR), but their approaches differ. WordPress employs a traditional SSR method, while Nextjs utilizes a modern, optimized approach with features like dynamic rendering, leading to differences in performance and developer experience.
Improved SEO performance:
Next.js facilitates dynamic rendering, improving SEO performance by delivering fully-rendered pages to search engines. In contrast, achieving optimal SEO in WordPress may necessitate additional plugins or configurations.
Enhanced Development Workflow (For developers):
React Components:
Next.js leverages React components, providing a more modular and flexible development workflow. Developers can create reusable components, enhancing code maintainability and collaboration.
Serverless Deployments:
Next.js supports serverless deployments, allowing for easy scaling and cost-effective infrastructure. This can be advantageous for projects with varying traffic patterns compared to the traditional server-centric approach of WordPress.
Hot Module Replacement (HMR):
Next.js supports Hot Module Replacement, enabling developers to see changes instantly without a full page reload.
Benefits From WordPress
User-Friendly Interface and plugin ecosystem:
WordPress provides an intuitive and user-friendly dashboard dedicated for content management with little technical knowledge. With plugins in maintenance WordPress offers extending functionality without extensive coding.
Opensource and large community:
WordPress is open-source and has a large and active community of users and developers. This support network can be valuable for troubleshooting, finding solutions, and staying updated on the latest developments in the WordPress ecosystem.
With blend of WordPress and Nextjs our site and we can enjoy maximum benefits.
How to create headless WordPress?
Running a headless WordPress with a Next.js frontend involves setting up WordPress as a content management system (CMS) and Next.js to create the frontend application that consumes data from WordPress through GraphQL Queries using WPGraphQL plugin in WordPress.
This tutorial assumes that you have these already:
Already implemented a WordPress site.
Nextjs app that is ready to be connected to the WordPress data.
Let’s start the step-by-step guide to help you to achieve this:
WordPress side: Installation of WPGrapghQL for WordPress.
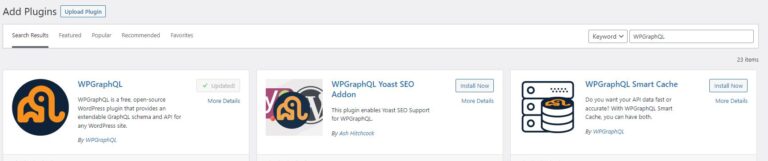
Install the WPGraphQL plugin:
a. Log in to your WordPress admin panel.
Go to “Plugins” -> “Add New.” Search for “WPGraphQL” and install the “WPGraphQL” plugin.
Figure 1: Graphql plugin installation.
After the installation activate the plugin. I have already done installation and activation that is why “install now” is not visible. For you, it should be there. For more information/ documentation of GraphQL schema click here:
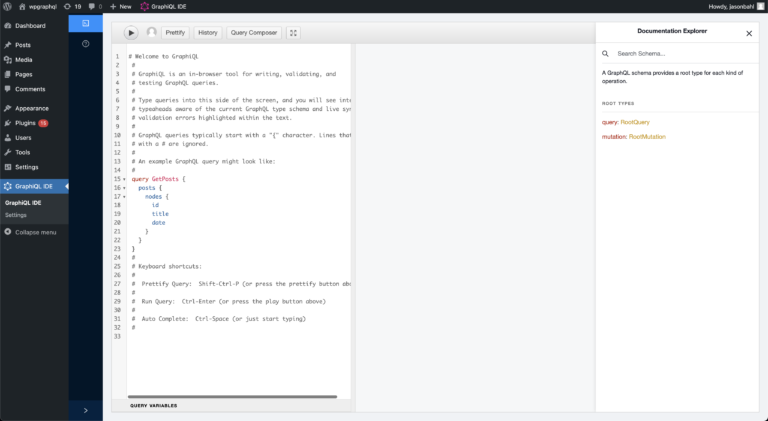
b. Use GraphQL IDE to generate GraphQL schema.
After installing the plugin on your WordPress site, locate the GraphQL tab in the left sidebar, click on it, and choose GraphiQL IDE from the resulting pop-up. This directs you to a GraphQL playground, allowing you to customize queries by selecting specific elements and experimenting with various parameters.
For more information on WP GraphQL IDE: click here.
Figure 2: WPGrapghQL IDE
For this tutorial we will use following GraphQL schema to query posts from WordPress site you already have, we will use the following:
					query GetPosts {
    posts {
      nodes {
        id
        title
      }
    }
  }
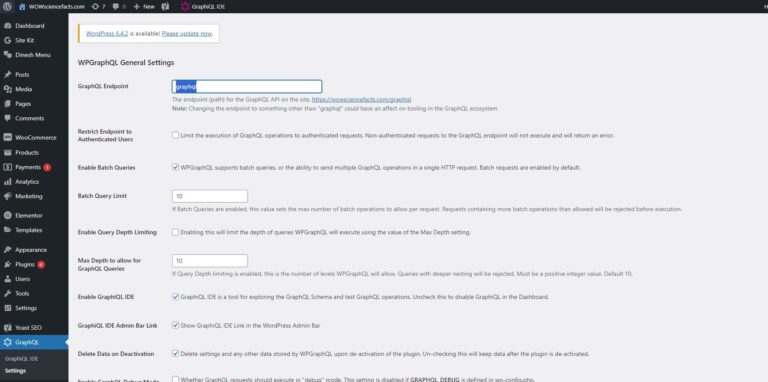
c. Edit API_URL:
Default is: Ex: https://wowsciencefacts.com/grapghql”
your_site_url/graphql.
You can edit/change as below from accessing settings:
How to edit API and end point
From Nextjs side:
We will be using apollo client in Nextjs app to access your WordPress data using graphql api endpoint, so first install Apollo client to nextjs app.
npm install @apollo/client graphql
After installation of apollo package. Create an Apollo Client file (services/apollo.js):
					import { ApolloClient, InMemoryCache } from '@apollo/client';
const client = new ApolloClient({
  uri: 'https://wowsciencefacts.com/graphql',
  cache: new InMemoryCache(),
});
export default client;
Update your pages/index.js as below to list all posts.
import { useQuery, gql } from '@apollo/client';
import client from '../services/apollo'; // we created
// you can change the GraphQL schema as you want: for this we will be using this.
const GET_POSTS = gql`
query GetPosts {
posts {
nodes {
id
title
}
}
}`;
const indexPage = () => {
const { loading, error, data } = useQuery(GET_POSTS, { client });
if (loading) return <p>Loading...</p>;
if (error) return <p>Error: {error.message}</p>;
// Note indexing is as schema we created inside data.
const posts = data.posts.nodes;
return (
<div>
<h1>Headless WordPress with Next.js front end using WPGraphQL plugin</h1>
<ul>
{posts.map((post) => (
<li><a href="”">{post.title}</a></li>
))}
</ul>
</div>
);
};
export default indexPage;
Now it is time to check your headless WordPress implementation. Start your app and visit your local host in the browser and enjoy the headless WordPress implementation with nextjs app.
npm run dev
In the upcoming tutorials, we’ll explore advanced techniques beyond the basics, including,
Fetch and show pages created using Elementor with Elementor CSS,
sitemap generation,
adding effective meta data and Open Graph (og) descriptions for SEO, and